How to Boot from a Repairo USB Drive
Your Repairo USB drive MUST be booted from to use it. This means you must shut down your PC completely, insert the USB drive, and follow the manufacturer-specific instructions for booting from the USB drive.
These instructions apply to all bootable Repairo USB drives, including:
- Repairo 64GB 4-in-1 Bootable USB
- Repairo 21-in-1 Linux OS USB
- Repairo PC Unlock Pro Password Remover USB
- Repairo Disk Wiper Pro USB
Are you getting a “Verification failed” error? This is normal and expected on some systems!
If you have SECURE BOOT set to ON, you may see an error that says “SECURITY VIOLATION” or something similar. If you do, CLICK HERE to follow our instructions for enrolling the MOK key of your flash drive so your system recognizes it as safe.

Booting your Repairo USB Drive Using BIOS Boot Menu
If you are lucky, then all that you must do to boot from a USB flash drive, regardless of the operating system installed on your PC, is choose the USB flash drive from the Boot Menu of your UEFI or BIOS. Make sure that your USB flash drive is bootable, and then plug it into any USB port on your computer.
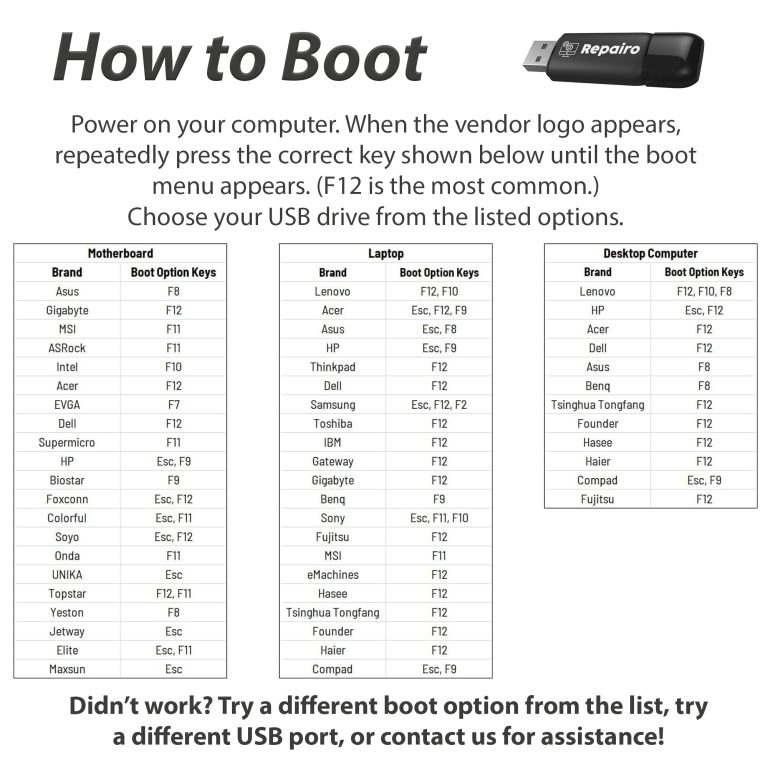
Next, power on your computer (or restart it if it is on). Immediately after powering it on, when the BIOS/UEFI screen appears, access the Boot Menu by pressing the right key(s) for it. Most PC manufacturers use the F8, F9, F10, or F11 keys for that, and many computers show the Boot Menu key(s) right after you power them on. However, if you cannot identify the right one, check the documentation for your computer’s motherboard or device manufacturer. The Boot Menu access key(s) should be mentioned in their user manuals.
Once the Boot Menu appears on the screen, use it to select the USB flash drive from which you want to boot and press Enter on your keyboard. Note that the USB flash drive can bear different names depending on what the PC or motherboard manufacturer wanted. Some list it as Removable Device, some as USB-HDD, and so on.
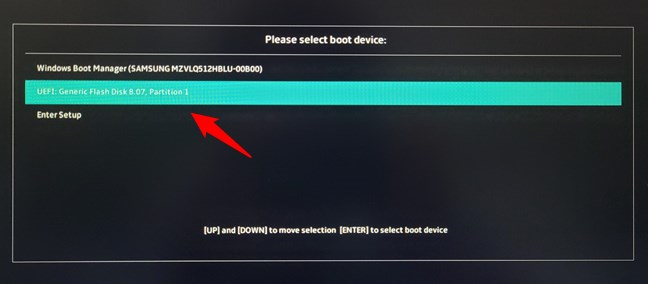
Once you’ve pressed Enter, the computer should boot from the USB flash drive.
See our table below for vendor-specific information on which key is most likely the correct key to press.
Video Instructions
See the below video clip for instructions on how to boot from a USB drive. The computer and the drive in the picture may be different from yours, but the overall process is similar. Keep in mind your brand of PC may have a different keyboard key to press than what is shown in the video. See the table above or refer to your computer manufacturer’s support website, or reach out to us for assistance!
Still having issues? Keep reading...
How to Disable Secure Boot
Introduction: It’s possible that SECURE BOOT is preventing booting from a USB drive. Before assuming your product or computer has an issue, please ensure secure boot is OFF.
Instructions:
-
Enter the BIOS/UEFI Settings:
- Restart your computer.
- Press the specific key to enter the BIOS/UEFI firmware settings during the initial boot phase. This key is typically displayed during the boot process and is often one of the following:
Del,F2,F10,F12,Esc, orEnter. Refer to your computer’s user manual or manufacturer’s website for the precise key.
-
Navigate to the Secure Boot Option:
- Once in the BIOS/UEFI settings, use the arrow keys to navigate. Look for a tab labeled ‘Security’, ‘Boot’, or ‘Authentication’.
- Within one of these tabs, you should find the
Secure Bootoption.
-
Disable Secure Boot:
- Select the
Secure Bootoption and change the setting from ‘Enabled’ to ‘Disabled’.
- Select the
-
Save Changes and Exit:
- After disabling Secure Boot, press the
F10key to save the changes, or navigate to the ‘Save & Exit’ tab in your BIOS/UEFI settings. - Select
Save Changes and ResetorExit Saving Changesto restart your computer with the new settings.
- After disabling Secure Boot, press the
-
Confirm Changes:
- Your PC will reboot. You can re-enter the BIOS/UEFI settings to confirm that Secure Boot is disabled.
- If you encounter any issues, consider consulting the help resources of your motherboard’s manufacturer.
Additional Notes:
- The interface of BIOS/UEFI can vary significantly between different firmware versions and manufacturers. If the options or tabs are different from what is described above, consult the documentation specific to your motherboard or PC model.
- After disabling Secure Boot, if you wish to enable it again, follow the same steps and change the setting from ‘Disabled’ to ‘Enabled’.
Does your PC have Bitlocker or other full disk encryption?
As mentioned in our Amazon listings, if your drive is fully encrypted and you lack the recovery key (this is different from your administrator password), you are not going to be able to reset your Windows password or access files on your system with this tool, or any tool on the market (despite some unscrupulous products’ claims to the contrary). You’ll have to turn off Bitlocker before being able to proceed using PC Unlock Pro or any of our tools which require accessing files on your OS drive.